Phase * can be skipped (depends on the flags passed to workflow container). For instance, for the local processing (no BIAFLOWS server), all steps are skipped while for a local BIAFLOWS instance upload_metrics may be skipped if the images to be processed are not annotated.
Creating a BIA workflow and adding it to a BIAFLOWS instance
(Developer guide)
Introduction
This section provides some more details on BIAFLOWS workflows and details how to compile and debug BIAFLOWS workflows Docker image locally and add them to an existing BIAFLOWS instance.
Details on Python wrapper script and JSON descriptor
The sequence of operations commonly performed by BIAFLOWS Python wrapper scripts is detailed in the following table. All workflows provided in BIAFLOWS repository follow this template. A complete reference to BIAFLOWS workflows JSON descriptor can be found online.
| Phase | Actions | Notes |
|---|---|---|
| Initialization* | Connect to BIAFLOWS Retrieve problem class Retrieve jobs parameters |
|
| Prepare_data* | Create empty in_folder, out_folder,
gt_folder, tmp_folderDownload all images without _lbl suffix to
in_folderDownload all images with _lbl suffix to
gt_folderDownload all images with attachments to gt_folder |
Folders are created in user home folder (gt: ground truth). File names: annotation files must have the same name as input images + _attached |
| Workflow_call | Call workflow from command line and passing in_folder,
out_folder and parameters
|
The images from in_folder are sequentially processed,
the results are stored in out_folder |
| Upload_data* | Parse images from out_folder (typically binary masks) and for each image/slice create annotations (polygon/ or point) and export them to BIAFLOWS | 1- Plain objects: extract connected particles (2D/3D) from mask, create
polygon contours (slice by slice) and set contour ID (color LUT) to mask
object ID 2- Points: find non null pixels/voxels. Create point annotation at this position 3- Skeleton: project mask (fully or by block), dilate, find contour around skeleton |
| Upload_metrics* | For each input file: call Compute/Metrics passing pair of out_file(s)/gt_file(s), problem class (string) and optional metric parameters. Export metrics key/values to benchmark database. | gt_file: same name as output_file If an attachment file is expected (e.g. division text file), it is assumed at the same location as out_file/gt_file and with the same name as the image + _attached.
|
Installing software required for development
As workflows run inside a Docker container and since their Python wrapper script interacts with a BIAFLOWS instance, it is required to install Docker and Python 3 on your local machine. Our Python client is also required for development.
Docker installation
For Linux
https://www.digitalocean.com/community/tutorials/how-to-install-and-use-docker-on-ubuntu-18-04
For Windows
https://docs.docker.com/docker-for-windows/install/#install-docker-for-windows-desktop-app
Python 3 & Cytomine Python client installation
See https://doc.uliege.cytomine.org/display/ALGODOC/Data+access+using+Python+client
In the following steps, we will use the workflow NucleiSegmentation-ImageJ as reference.
Workflow development
1. Uploading a new workflow descriptor to BIAFLOWS
Workflows have first to be described through a JSON descriptor, e.g.: https://github.com/Neubias-WG5/W_NucleiSegmentation-ImageJ/blob/master/descriptor.json
Currently, some sections have to be customized manually, and some conventions must be respected to allow automatic parsing by BIAFLOWS. We recommend using https://github.com/Neubias-WG5/W_Template/blob/master/descriptor.json as template for your JSON descriptor.
Choose a workflow name that does not contain space. The description field (supporting restricted HTML) should be filled to document the workflow and it will be displayed from BIAFLOWS UI.
As inputs (workflow parameters), 5 parameters are mandatory:
- cytomine_host
- cytomine_public_key
- cytomine_private_key
- cytomine_id_project
- cytomine_id_software
The fields associated to workflow parameters are described here:
idthe parameter name (e.g :ij_radius)value-keya reference for the parameter in the command line. Keep@ID, which is a shorthand meaning replace by the parameter id, in uppercase. In our example, it will be replaced at parsing time byIJ_RADIUScommand-line-flagAt execution time, the value-key in the command line will be replaced by the command-line-flag followed by the parameter value. Keep--@id. In our example, it will be replaced in the command line by--ij_radius.namea human readable name displayed in BIAFLOWStypeNumber, String, Booleanoptionalset to true only if the workflow execution is not influenced by the presence or the absence of the parameter (e.g a verbose parameter). Workflow parameters having an influence on the results should never be optional.default-valuethe default value of the parameter (in BIAFLOWS interface).
Do not forget to update the command line, with the parameter value keys.
For instance, for workflow parameters ij_radius and ij_threshold
python wrapper.py CYTOMINE_HOST CYTOMINE_PUBLIC_KEY CYTOMINE_PRIVATE_KEY \
                  CYTOMINE_ID_PROJECT CYTOMINE_ID_SOFTWARE IJ_RADIUS IJ_THRESHOLD
from cytomine import Cytomine
from cytomine.utilities.descriptor_reader import read_descriptor
with Cytomine(host, public_key, private_key) as c:
	read_descriptor("descriptor.json")
host is the url of your BIAFLOWS server, e.g.
https://biaflows.neubias.org,
public_key and private_key can be found from user
Account page (section API KEYS).

2. Linking a new workflow to a BIAFLOWS project
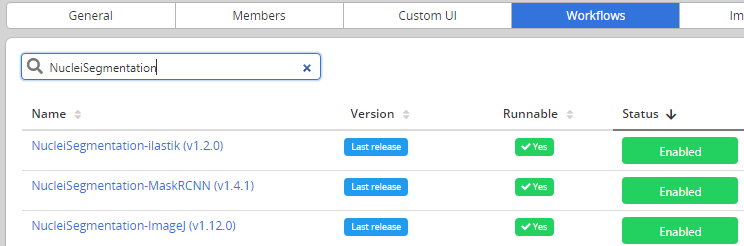
- From Problems, select the problem to which you want to add the workflow
- Go to Problems > Configuration > Workflows and enable the workflow
For now, as the workflow has been added manually, it will be referenced as Not Runnable and no version information will be provided from the UI.
Next, Go to Projects > Configuration and make sure that Jobs tab is activated (green)
3. Creating the Dockerfile
Docker files specify the execution environment. They typically start by creating (FROM) a layer from an existing Docker image with basic operating system. Then they execute commands (RUN) to install specific software and libraries, and copy (ADD) files (e.g. the Python wrapper script and workflow script) into the execution environment the workflow will be called from. Finally, the ENTRYPOINT is set to the wrapper script.
A sample DockerFile is available here: https://github.com/Neubias-WG5/W_NucleiSegmentation-ImageJ/blob/master/Dockerfile
If you do not know how to configure the Dockerfile, it is recommended to adapt the Dockerfile from an existing BIAFLOWS workflow using the same target software (e.g. an ImageJ macro).
If you create a Dockerfile from scratch, always use the most accurate
tag when referring to an existing Docker image
(e.g. prefer python:3.6.9-stretch over python:3.6).
If the tag is not accurate, the underlying docker image could change
over time, heavily impairing reproducibility!
4.Creating the wrapper script
It is recommended to adapt a wrapper script:
- from same problem class
- processing image of same dimensionality (e.g. 3D)
- matching the software you are planning to use (e.g. ImageJ macro).
The flag is_2 should be used to specify if the images are
strictly 2D or multidimensional.
5. Building the workflow image, running it in a local container and debugging
A new workflow can be directly pushed to GitHub and be built in DockerHub, but it is preferable to test it locally beforehand. For this, it is required to build and run the Docker image locally:
Building the container (you need at least around 5GB disk space for this operation)
From a directory where you gathered the 4 files required to describe the workflow:
cd ~/Documents/Code/NEUBIAS/W_NucleiSegmentation-ImageJ
sudo docker build -t seg2d .
seg2d is the name of the Docker image to build locally.
Running the Docker image
TODO CORRECT THAT WITH software_id/workflow_id and project_id/problem_id
sudo docker run -it seg2d --host host --public_key public_key --private_key private_key --software_id workflow_id --project_id problem_id --ij_threshold 15 --ij_radius 4
The list of command-line parameters should exactly match the parameters
defined in the JSON descriptor file. BIAFLOWS instance URL and credentials
should also be filled, as well as valid workflow_id (using --software_id)
and problem_id (using --projet_id).
These IDs can be retrieved from the URL bar while respectively clicking on a problem (from BIAFLOWS Problems tab) and on a workflow (from BIAFLOWS Workflows tab):

In this example, workflow_id is 23771763.

In this example, problem_id is 5955.
sudo docker run -it seg2d --host host --public_key public_key --private_key private_key --software_id 23771763 --project_id 5955 --ij_threshold 15 --ij_radius 4
If a workflow fails at execution this is reported in Workflow runs section. Some Execution log information can be downloaded by expanding a workflow run from the blue arrow .
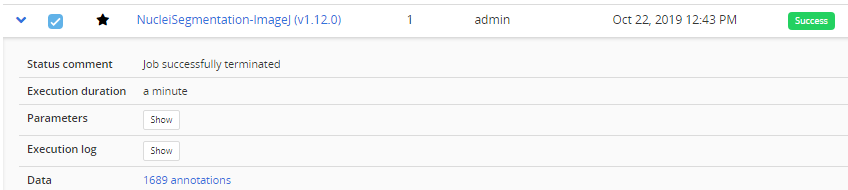
In this case, no associated benchmark metric is associated to this run. There is hence no risk that this would be left unnoticed by the user. For debugging, Docker can be run with an interactive session:
sudo docker run --entrypoint bash -it seg2d
If needed, it is also possible to launch the Docker with X enabled,
e.g. to debug ImageJ macro more easily by adding the option
-e DISPLAY=$DISPLAY -v /tmp/.X11-unix:/tmp/.X11-unix
xhost + sudo docker run --entrypoint bash -e DISPLAY=$DISPLAY -v /tmp/.X11-unix:/tmp/.X11-unix -it seg2d
If you want to access local images without having to download them each time from
BIAFLOWS, you can also attach a local folder to a folder inside the Docker
container (-v option), for instance:
sudo docker run --entrypoint bash -v /home/yourusername/tmp/test:/data -it seg2d
Some other useful Docker commands
- Check if an image is running:
ps -a - Remove a running container:
sudo docker rm CONTAINER_ID - Remove all running containers:
sudo docker rm $(sudo docker ps -a -q) - Download a specific container
sudo docker pull neubiaswg5/fiji-base:latest
To download a recently updated workflow image, it is necessary to first remove older versions manually.
6. Adding your workflow to a BIAFLOWS server
Once your workflow is running properly, you can officially publish it with version control.
To allow automatic import to BIAFLOWS, the set of files previously described should be stored in a GitHub repository (linked to DockerHub) from an account trusted by the target BIAFLOWS instance.
The Github repository name must be given by {prefix}{workflow_name}
{prefix}is an optional prefix for the trusted source (see Installing and populating BIAFLOWS locally){workflow_name}is the name of the workflow as given in the name field in the JSON descriptor (see Step 1).
For instance, for a trusted source with a prefix W_: W_NucleiSegmentation-ImageJ.
Adding/editing trusted sources is performed from Admin / Trusted sources (Installing and populating BIAFLOWS locally).

7. Linking a GitHub repository to DockerHub (only once)
We assume that you created a trusted GitHub organization (e.g. neubias-wg5) and a workflow repository holding the 4 workflows files. It is now required to link DockerHub to GitHub. Fortunately, this operation has to be performed only once for a given GitHub organization:
- Create an account on DockerHub : https://hub.docker.com/ and login
- Create an automatic build by linking Docker account to GitHub organization account
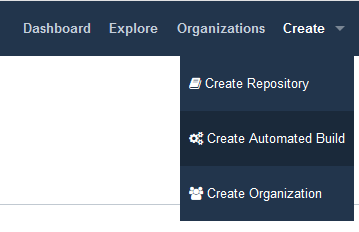
- On DockerHub website, click on Create > Create Automated Build
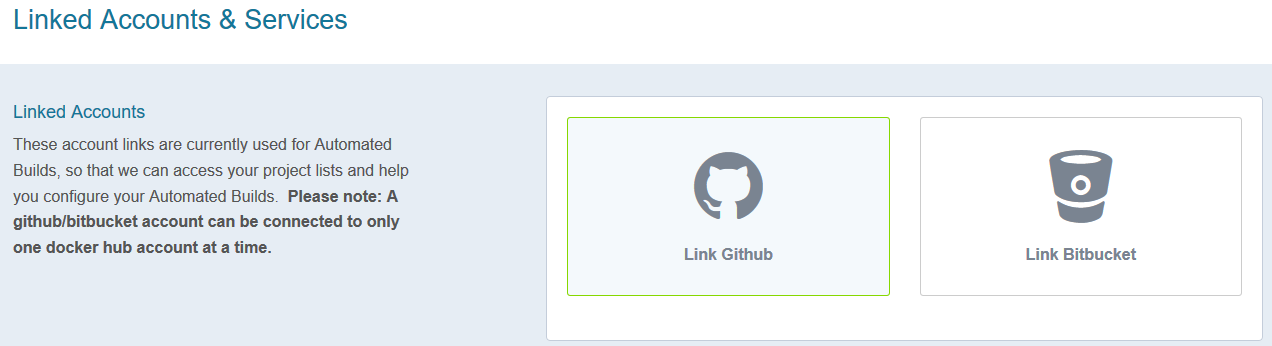
- In Linked Accounts, click on Link Github
- Click Select
- Ensure that Organization access (e.g. Neubias-WG5) is selected (green check mark) and click on Authorize docker
- Enter your GitHub password to enable access
8. Associating a new workflow repository to DockerHub
Once your GitHub organization account and DockerHub are linked, it is possible to create an automated build procedure for each workflow. This procedure will build a workflow Docker image each time a new release is triggered from a GitHub workflow repository. This image is automatically downloaded by the BIAFLOWS instance and the new workflow version will be available for the target problem.
To do so, from DockerHub:
- Click on Create > Create Repository+
- In build settings click on GitHub icon
- Select organization (e.g. neubiaswg5) and workflow Github repository (e.g. W_NucleiSegmentation-ImageJ) at the bottom of the page
- Choose the Docker registry repository name. In practice, keep the same as Github repository (DockerHub will convert uppercase letters into lowercase).
- Enter a short description (less than 100 characters) and click Create
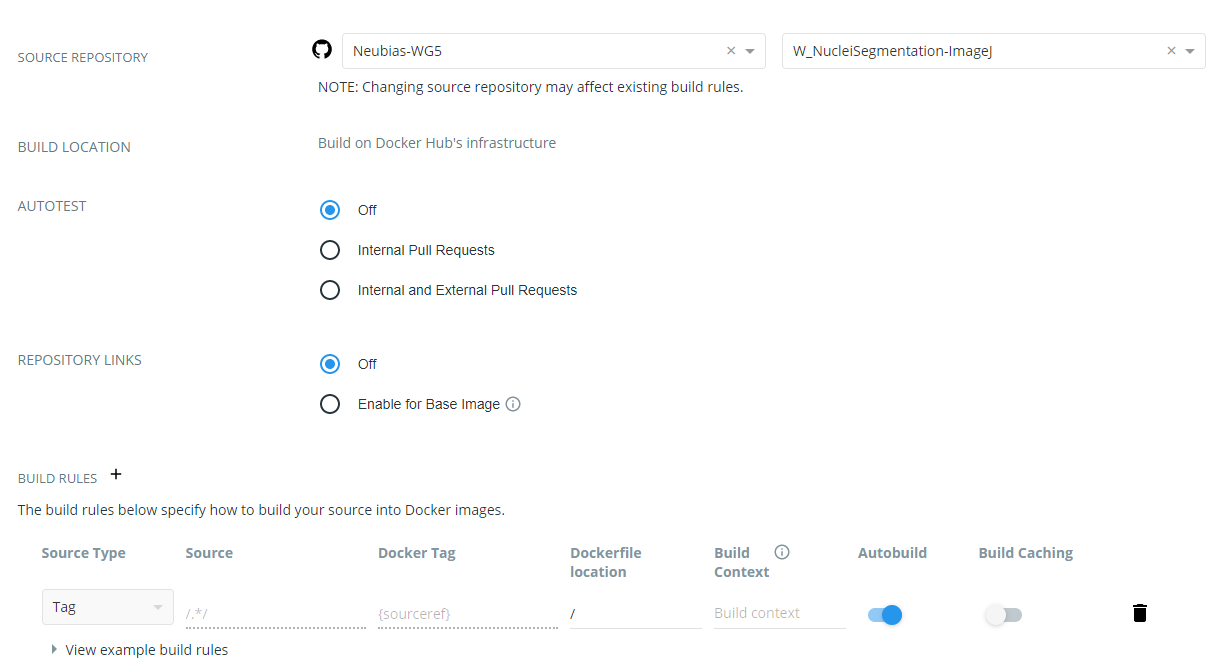
- Click on Click here to customize the build settings and configure as in figure below
- Click on Save
The DockerHub repository name must be reflected in the JSON descriptor
image = {dockerhub_organization}/{github_repo_name.toLowerCase()}
container-image:
{
	image: "neubiaswg5/w_nucleisegmentation-imagej",
	type: "singularity"
},
9. Creating a versioned release on GitHub
To create versioned releases of the workflow, go to GitHub and draft a new release (see doc). This will add a new tag to the last commit. As we configured automatic build in previous step, a new Docker image will be built and published with the same tag. BIAFLOWS instances trusting this GitHub / DockerHub repository will now automatically fetch and make this new version available from the UI (possibly tis may take up to 5/10 minutes).