BIAFLOWS User Guide
Introduction
BIAFLOWS online instance can be accessed from: https://biaflows.neubias.org.
It is possible to browse the content in read only mode from the guest account (username: guest; password: guest).
Workflows cannot be launched from the guest account but all results from past workflow runs can be accessed.
The platform has been tested for Chrome, Chromium, Safari and Firefox.
Any feedback is welcome by e-mail or through our GitHub repository Issues.
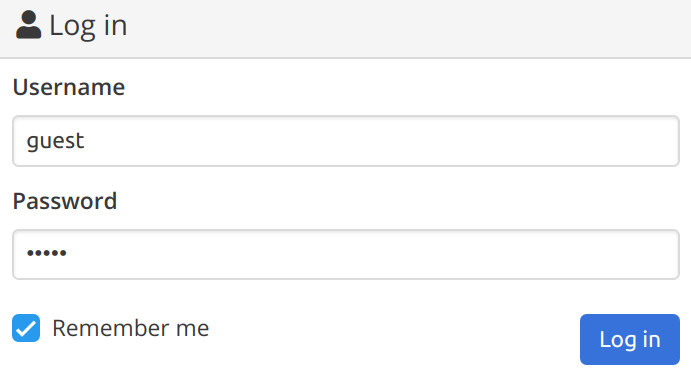
Login
Login using guest/guest.
Homepage
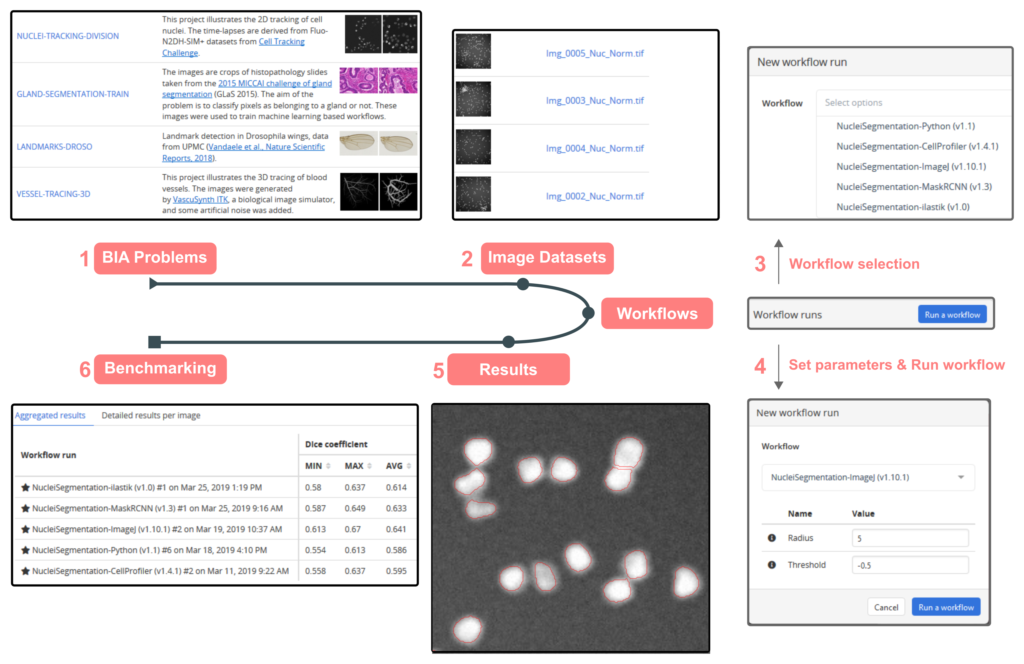
The homepage provides an overview of the navigation in BIAFLOWS (also accessible from Help > How to use).
BIAFLOWS main sections (Workspace, Problems, Workflows) can be browsed from the top bar menu.
The navigation is summarized in the figure below:
Problems

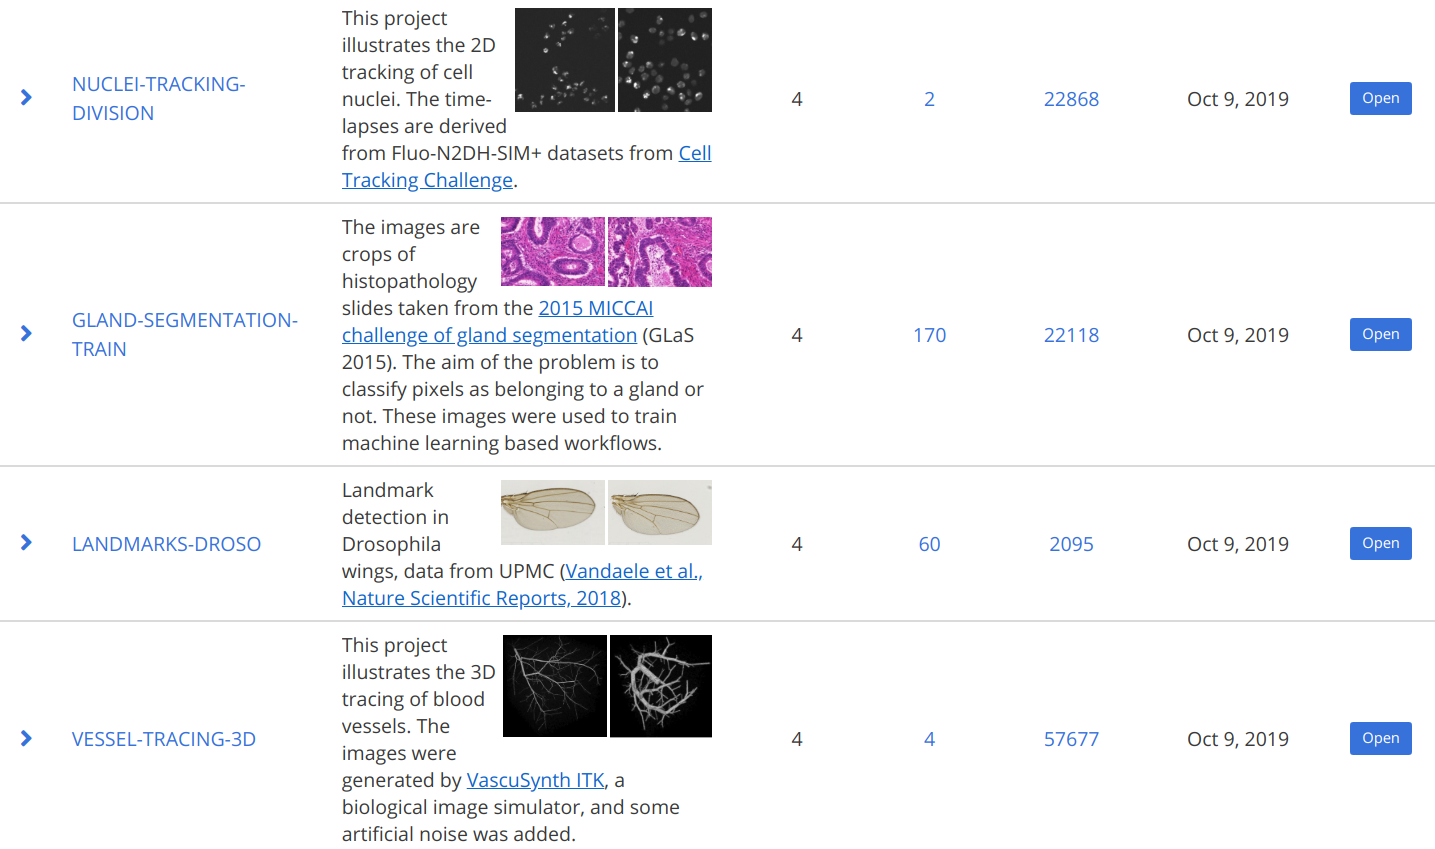
Problem list
The Problems section brings an overview of all BIA problems currently available in BIAFLOWS online instance. Each Problem recapitulates a common BIA Problem by gathering a set of ground truth annotated images and compatible workflows to process them.
Clicking on a Problem redirects to the list of images available for this Problem.
A Problem class (e.g. object segmentation) is associated to every Problem; BIAFLOWS currently supports 9 Problem classes:
- Object counting
- Object detection
- Landmark detection
- Object segmentation
- Particle tracking
- Object tracking
- Pixel classification
- Filament tree tracing
- Filament networks tracing
A Problem class specifies the format of ground truth annotations (e.g. skeleton binary mask), as well as the benchmark metrics to be evaluated on all annotated images available for that Problem. The annotation format is identical to the output expected by the workflows of a Problem. See this document and the contextual help (information icons) from Benchmark results table.
Images
This table lists all the images for the current Problem, where details can be displayed for each image.
Images can be filtered by name by typing a keyword in the search bar and they can be visualized by clicking on their name or thumbnail.
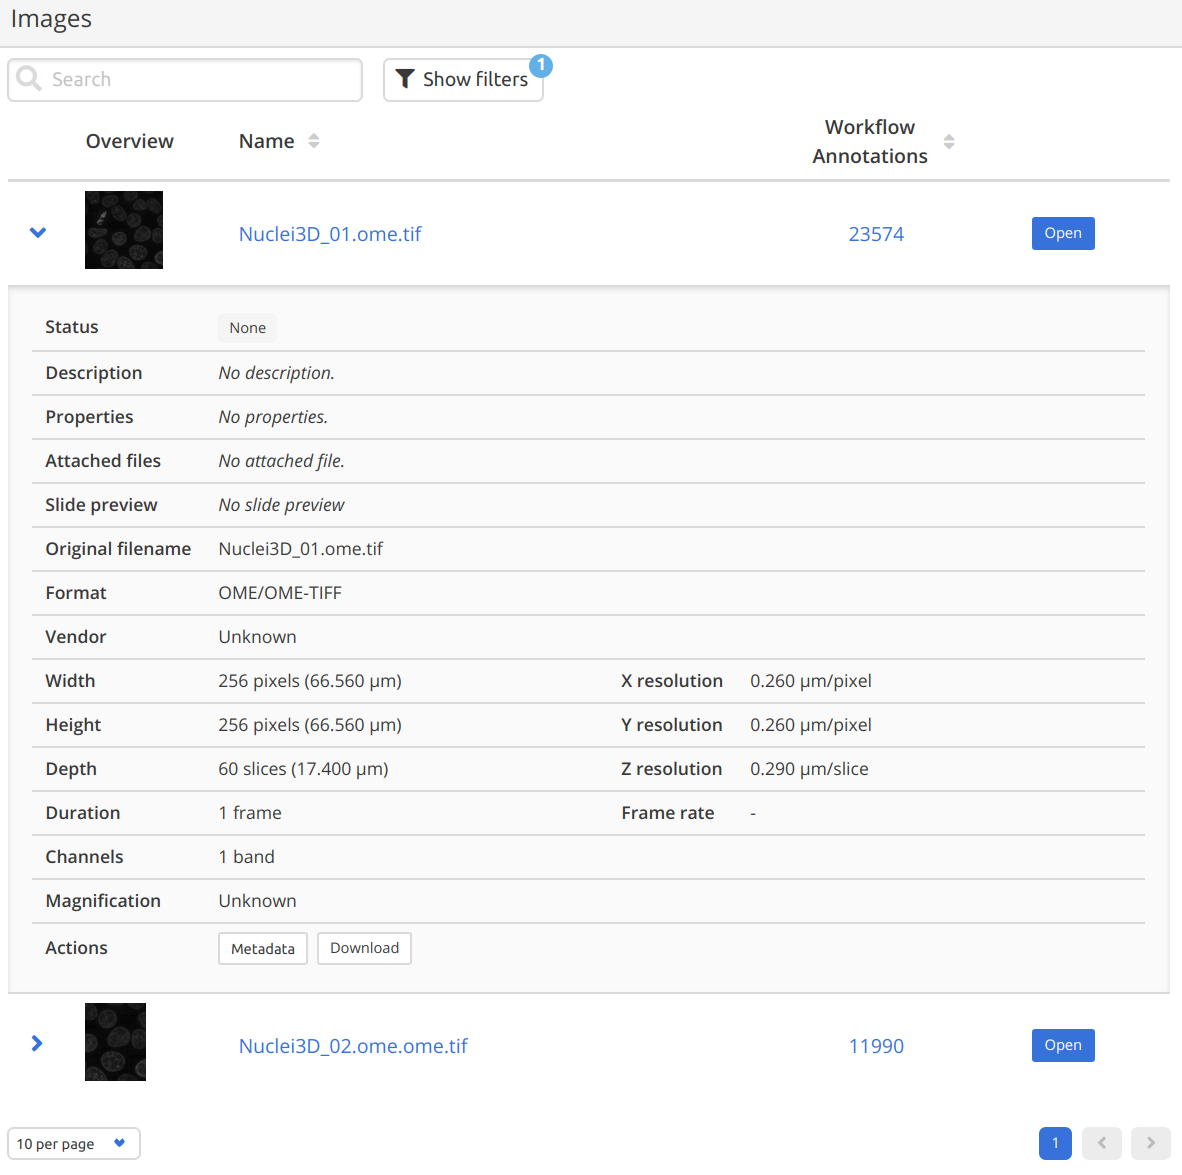
In case ground truth annotations are stored as image masks (this depends on the problem class), the masks can be displayed by toggling a filter (click on "Show filters" then select Type > Groundtruth). If ground truth annotations are in a different format (e.g. SWC or text file), they can be accessed through the Attached Files available from Image description (blue arrow).
Finally, all images can be downloaded from the button.
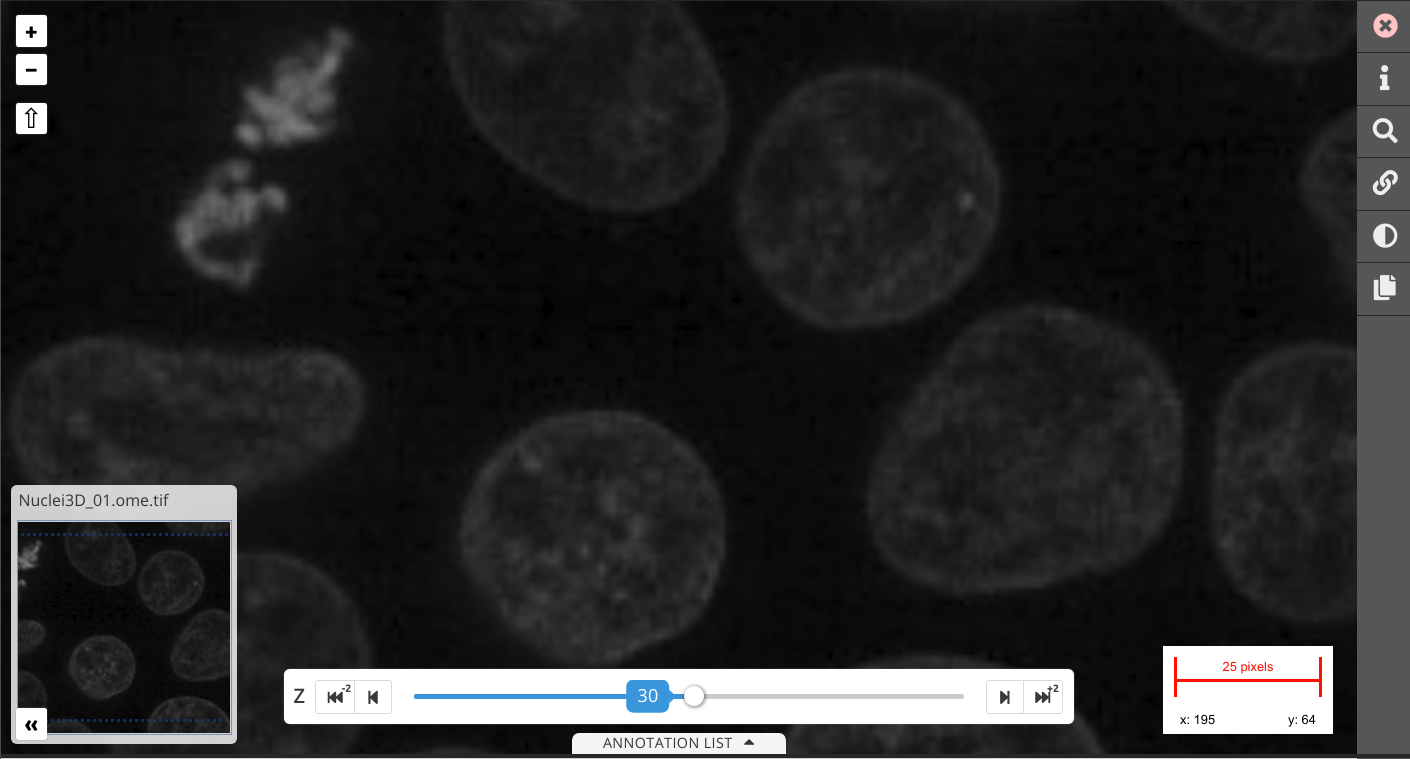
Image Viewer
You can click on an image in the image list to open the Image Viewer.
Navigation
Use mouse scroll to zoom in/out, click + drag to move around.For multidimensional images, C-Z-T slicers automatically appears (when applicable) to navigate through the slices.
Layers
To overlay an annotation layer, click on in the right toolbar.
Annotation layers are generated from the results of a workflow run. Several layers can be overlaid on the original image, and they can be hidden by unselecting the checkbox under the symbol, or removed using .
By default, the ground truth layer is selected and visible in blue
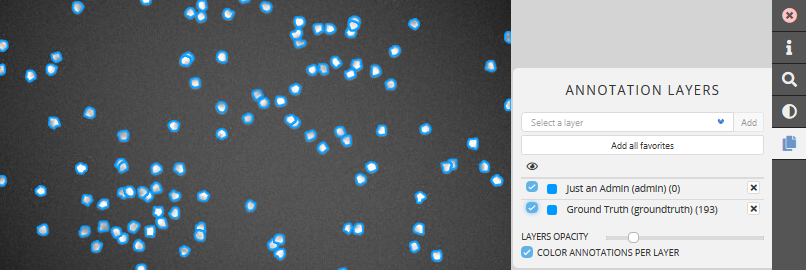
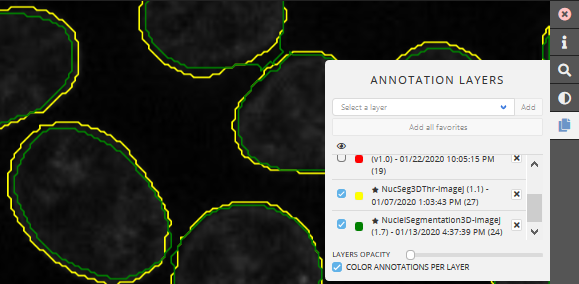
You can add as many annotation layer as you want. By default, each layer is displayed with a unique color.
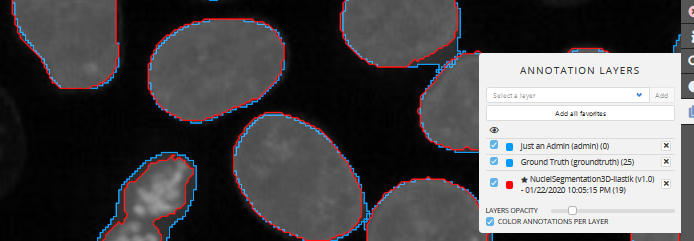
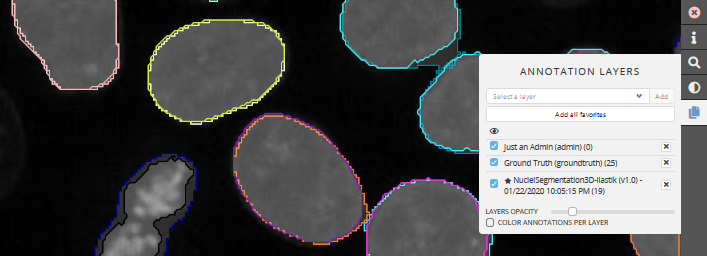
If you uncheck the check box COLOR ANNOTATION PER LAYER, a unique color is set by object instead of by layer.
In addition, LAYER OPACITY can be adjusted with the bottom slider.
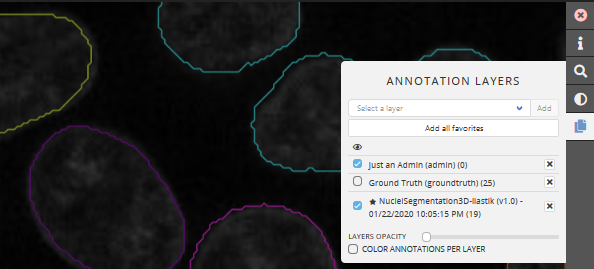
If you do not know which annotation layer to display, click on . Favorite workflow runs were validated by their maintainer as providing representative results.
Multiple viewers
It is also possible to have multiple viewers opened at once and synchronized (e.g. 4 synchronized views where top left is the original image and others are workflow runs overlays):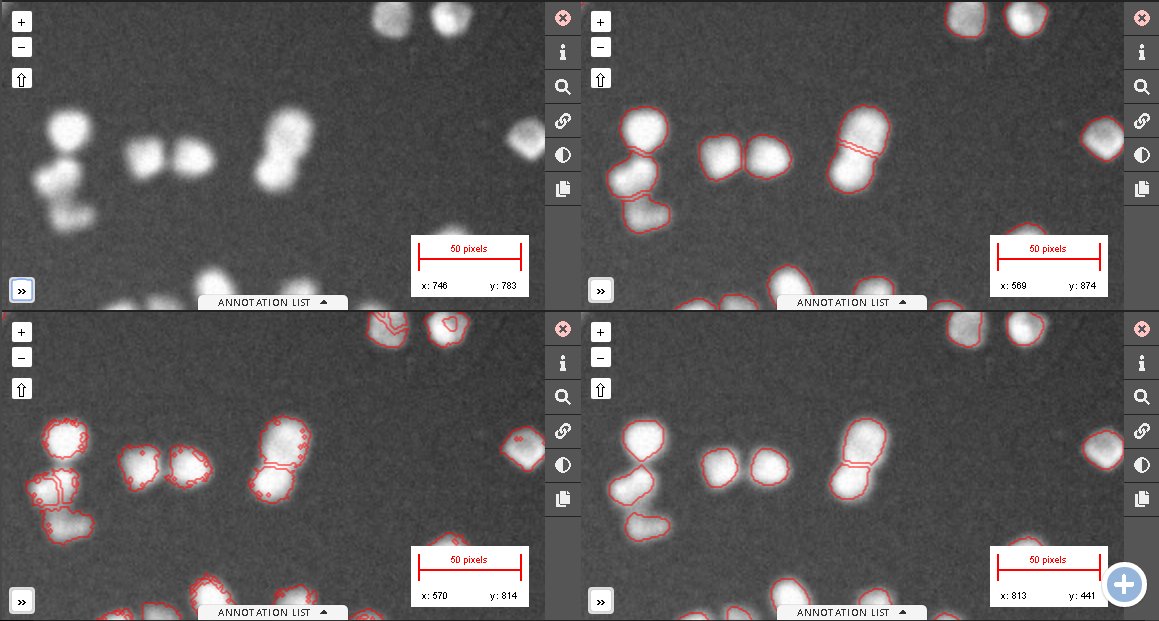
The current image can be downloaded by clicking on the image information panel in the right toolbar, then on (next to More information). For 2D images, it is also possible to switch to previous/next image using corresponding buttons ( / ) from this panel.
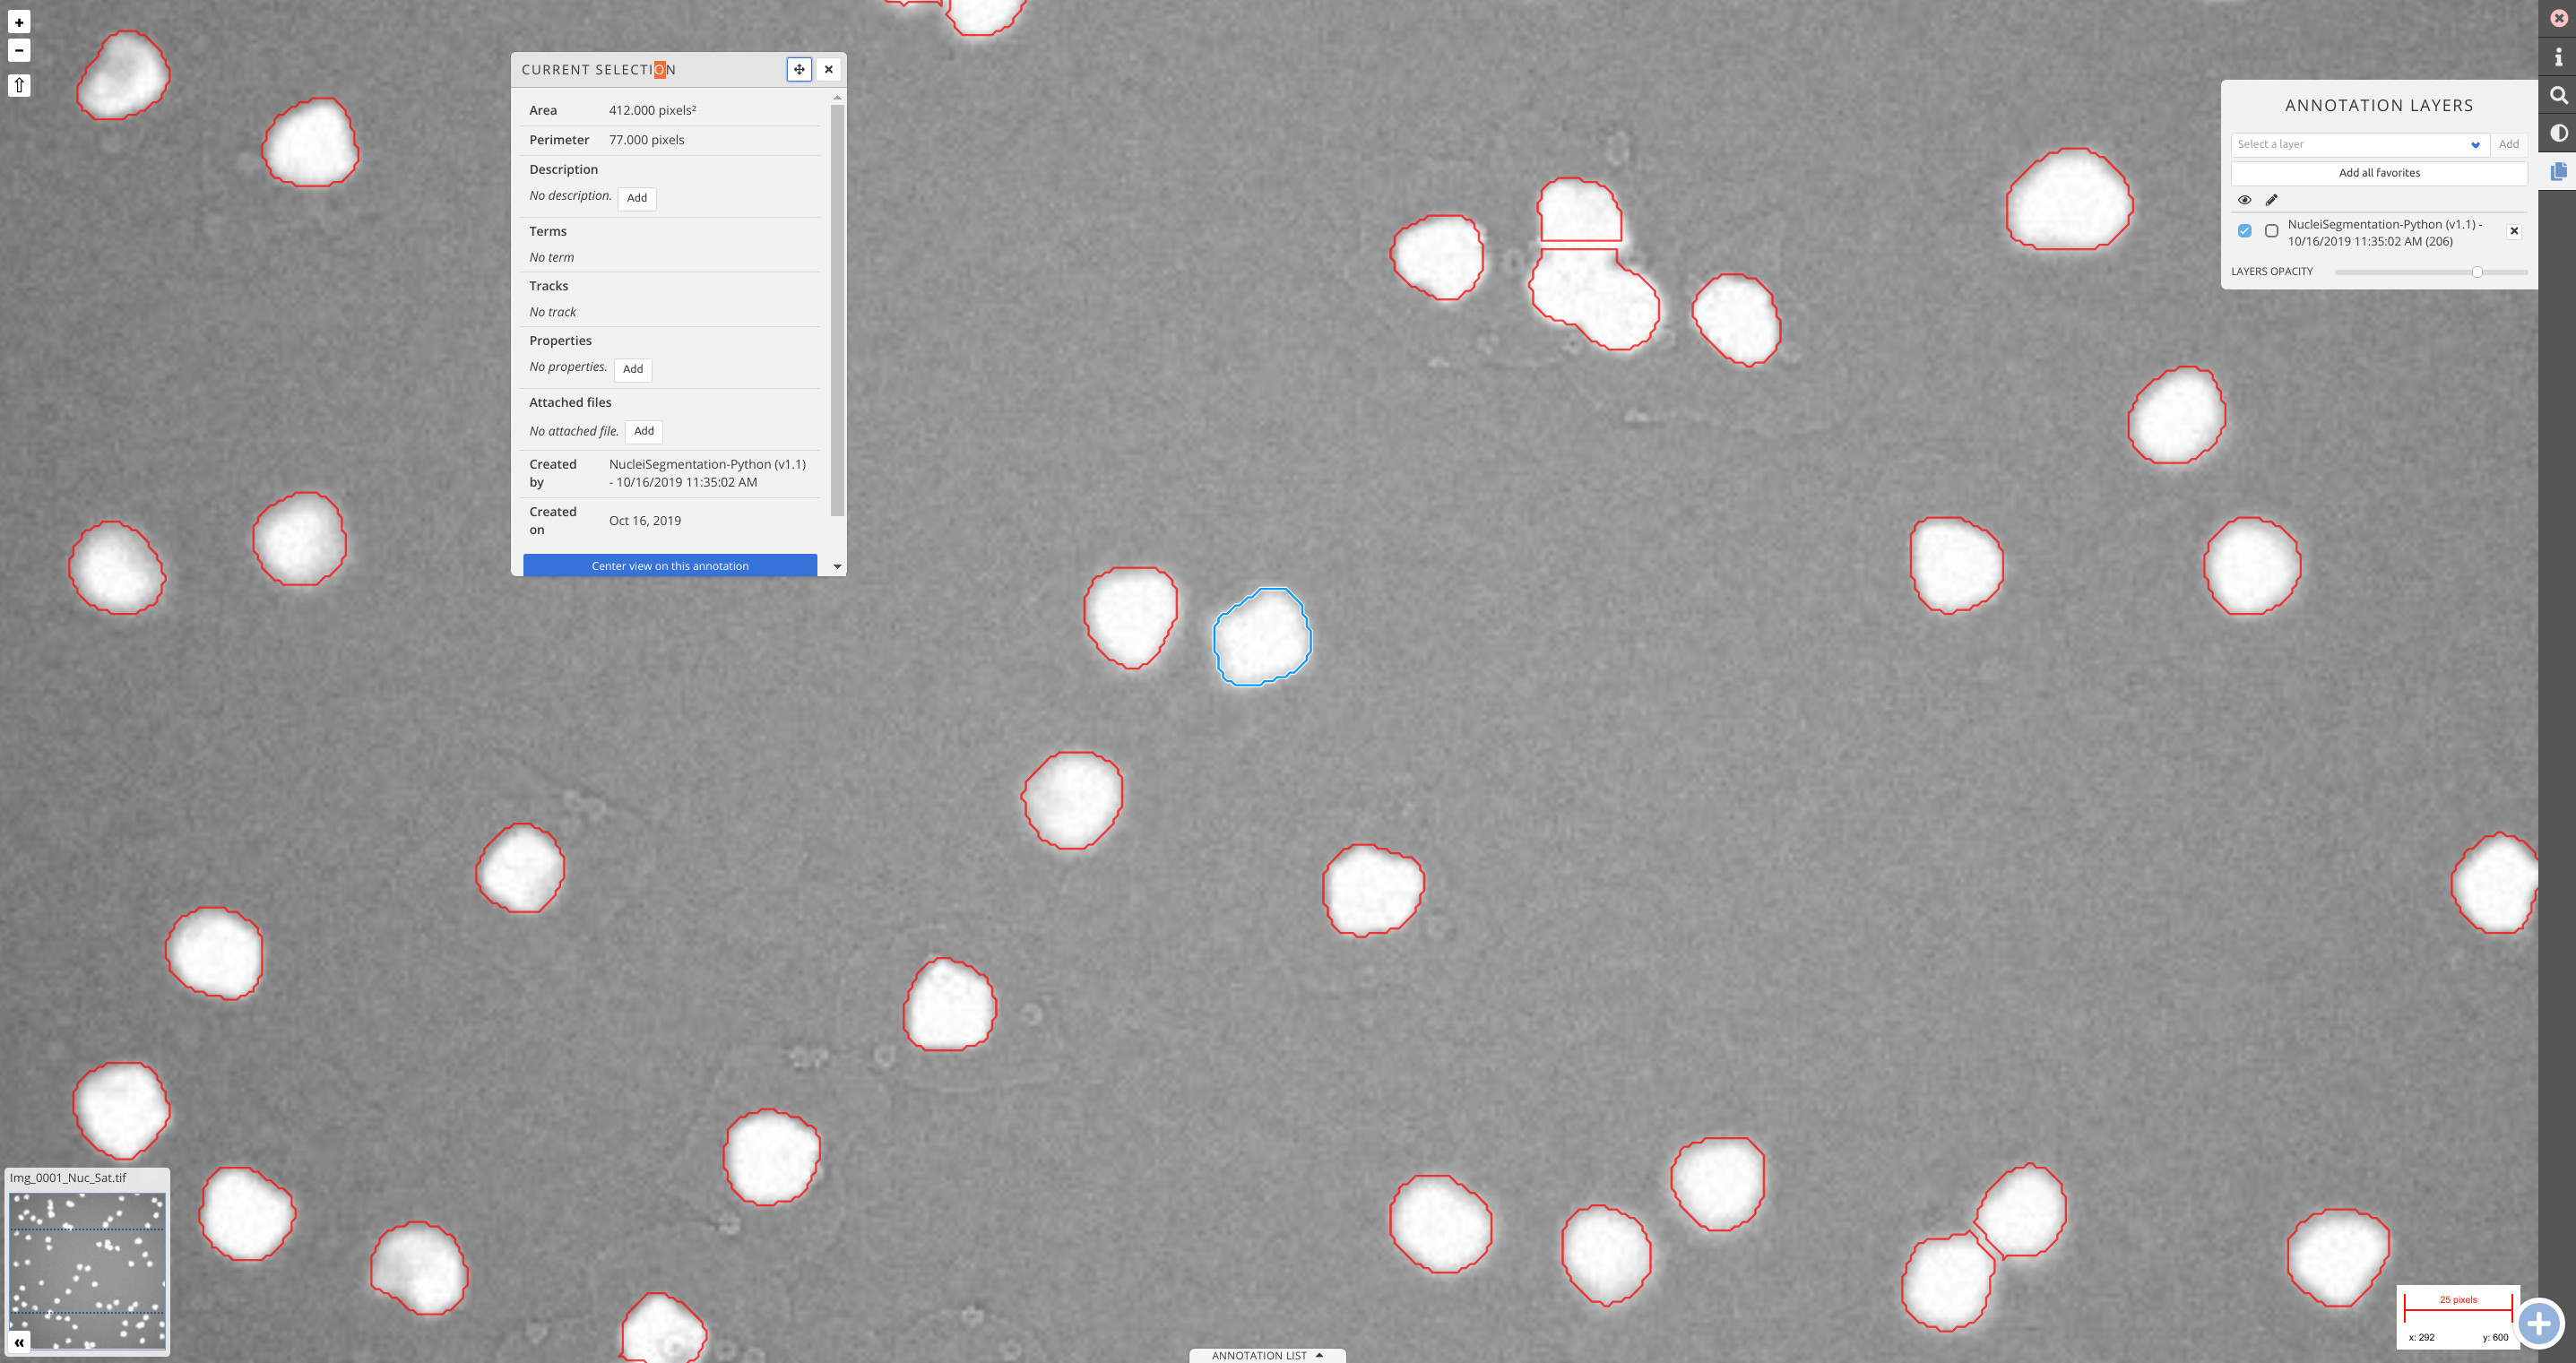
Finally, clicking on an annotation in the viewer will display some information (e.g. annotation area and perimeter).
Image adjustments
Contrast and gamma correction can be adjusted from the panel (right toolbar). The image can also be video inverted from this panel.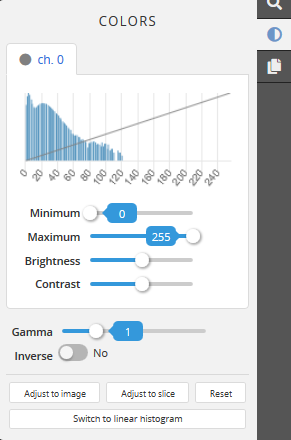
Workflows

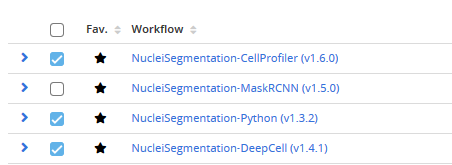
Workflow list
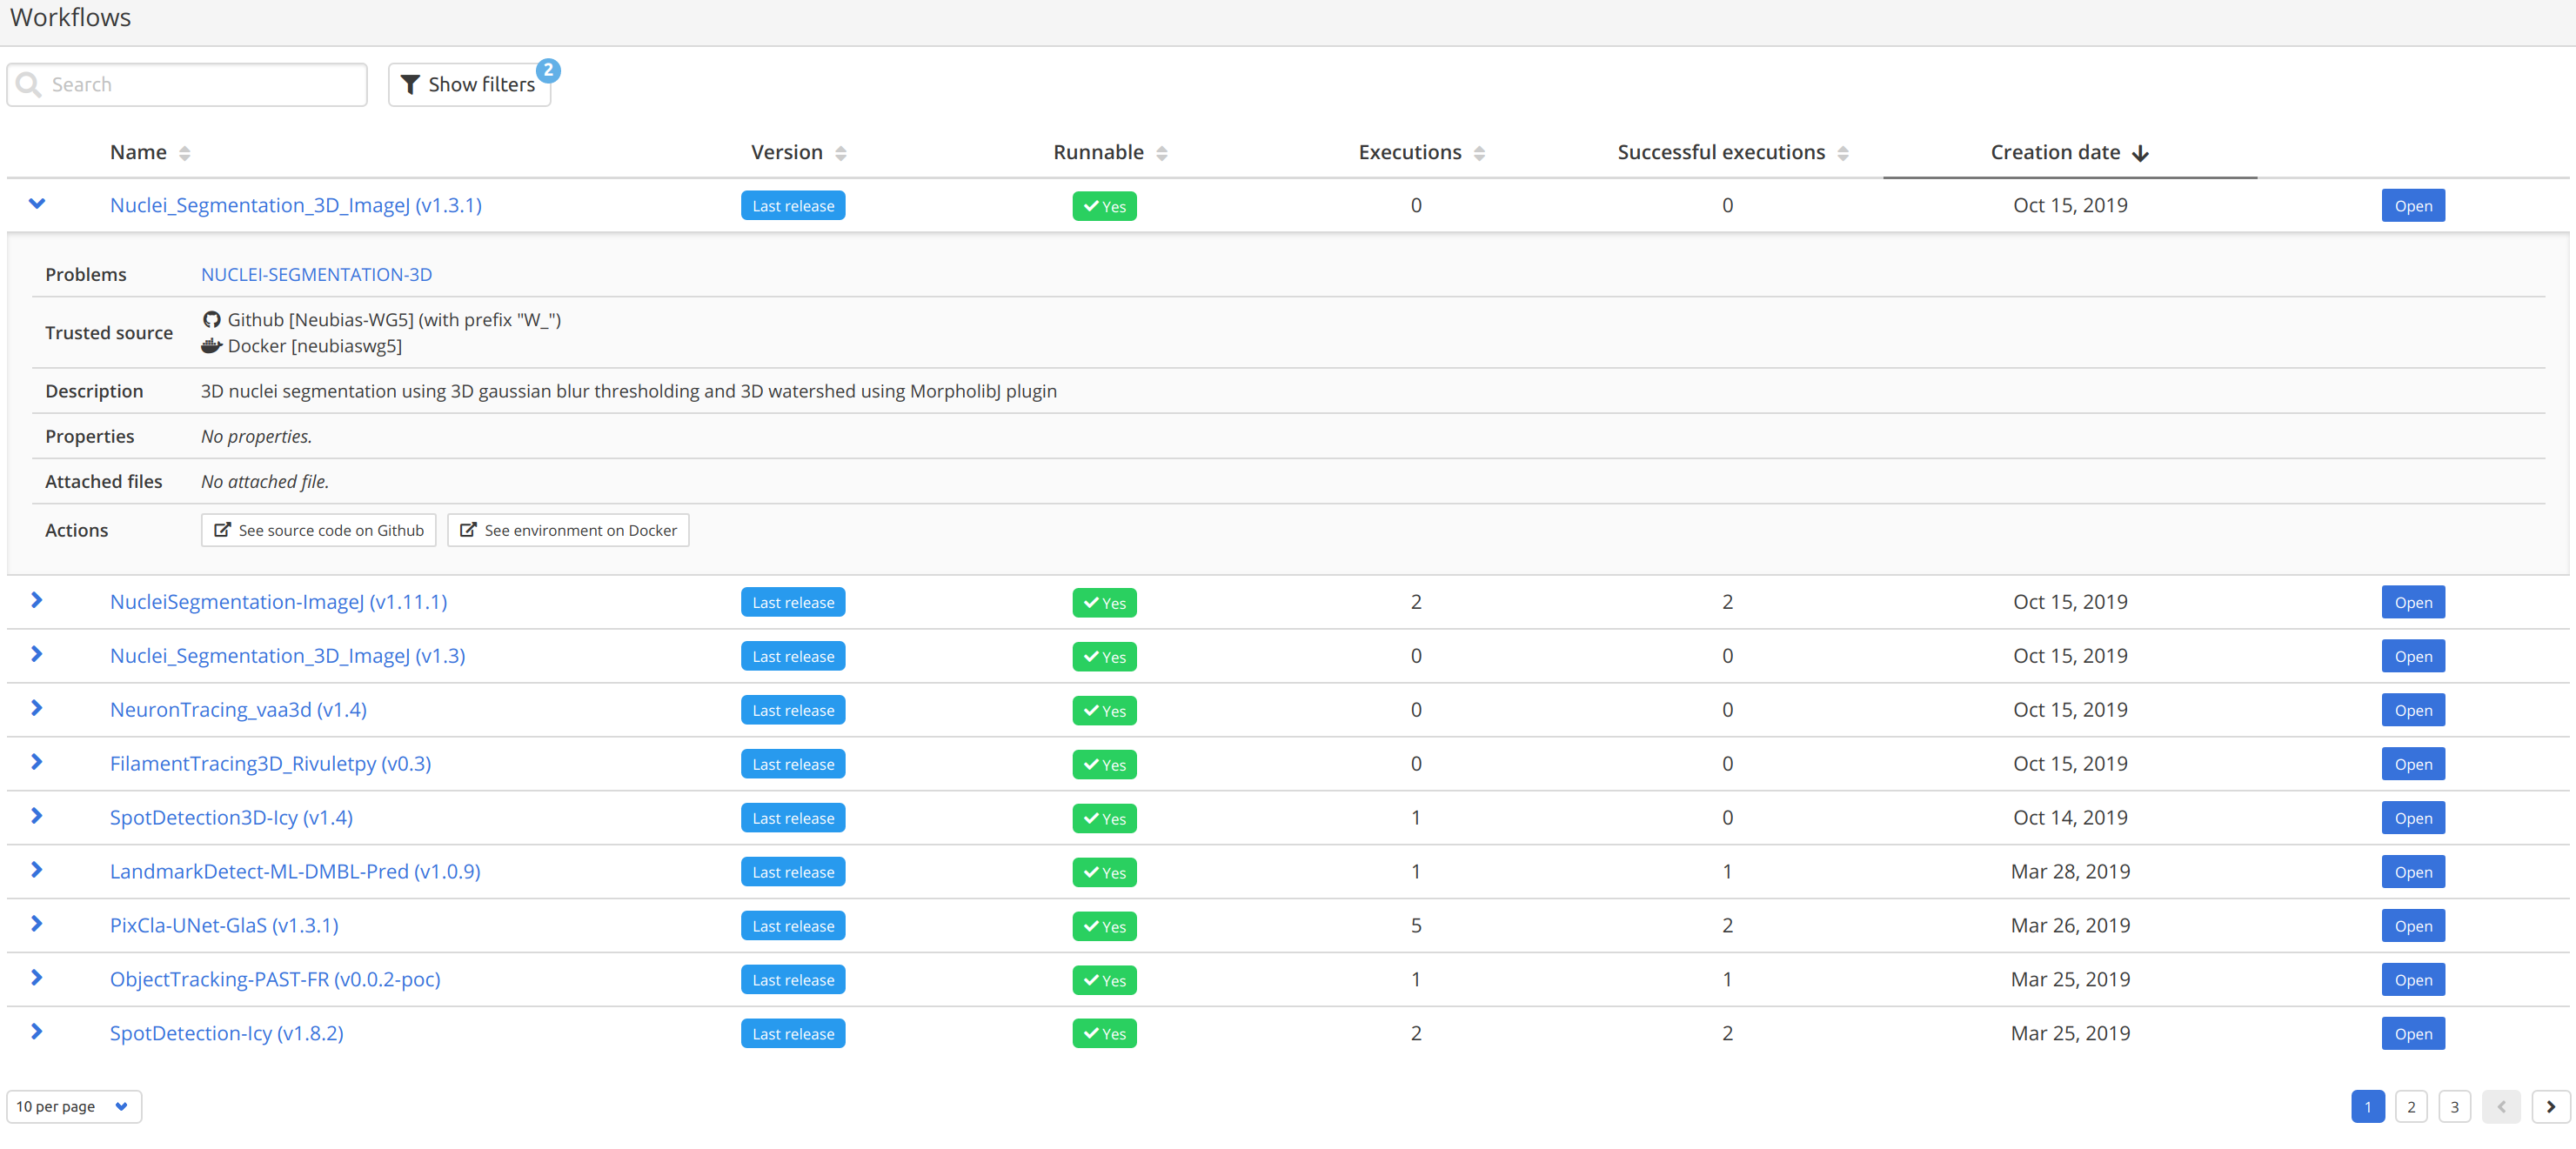
This page lists all workflow currently available in the platform. For each workflow, the most relevant workflow is the last executable version but all past versions can also be displayed ("Show filters", then Only Last Realeases -> No). Workflows can also be filtered by name or by number of executions from the search bar.
Workflow runs
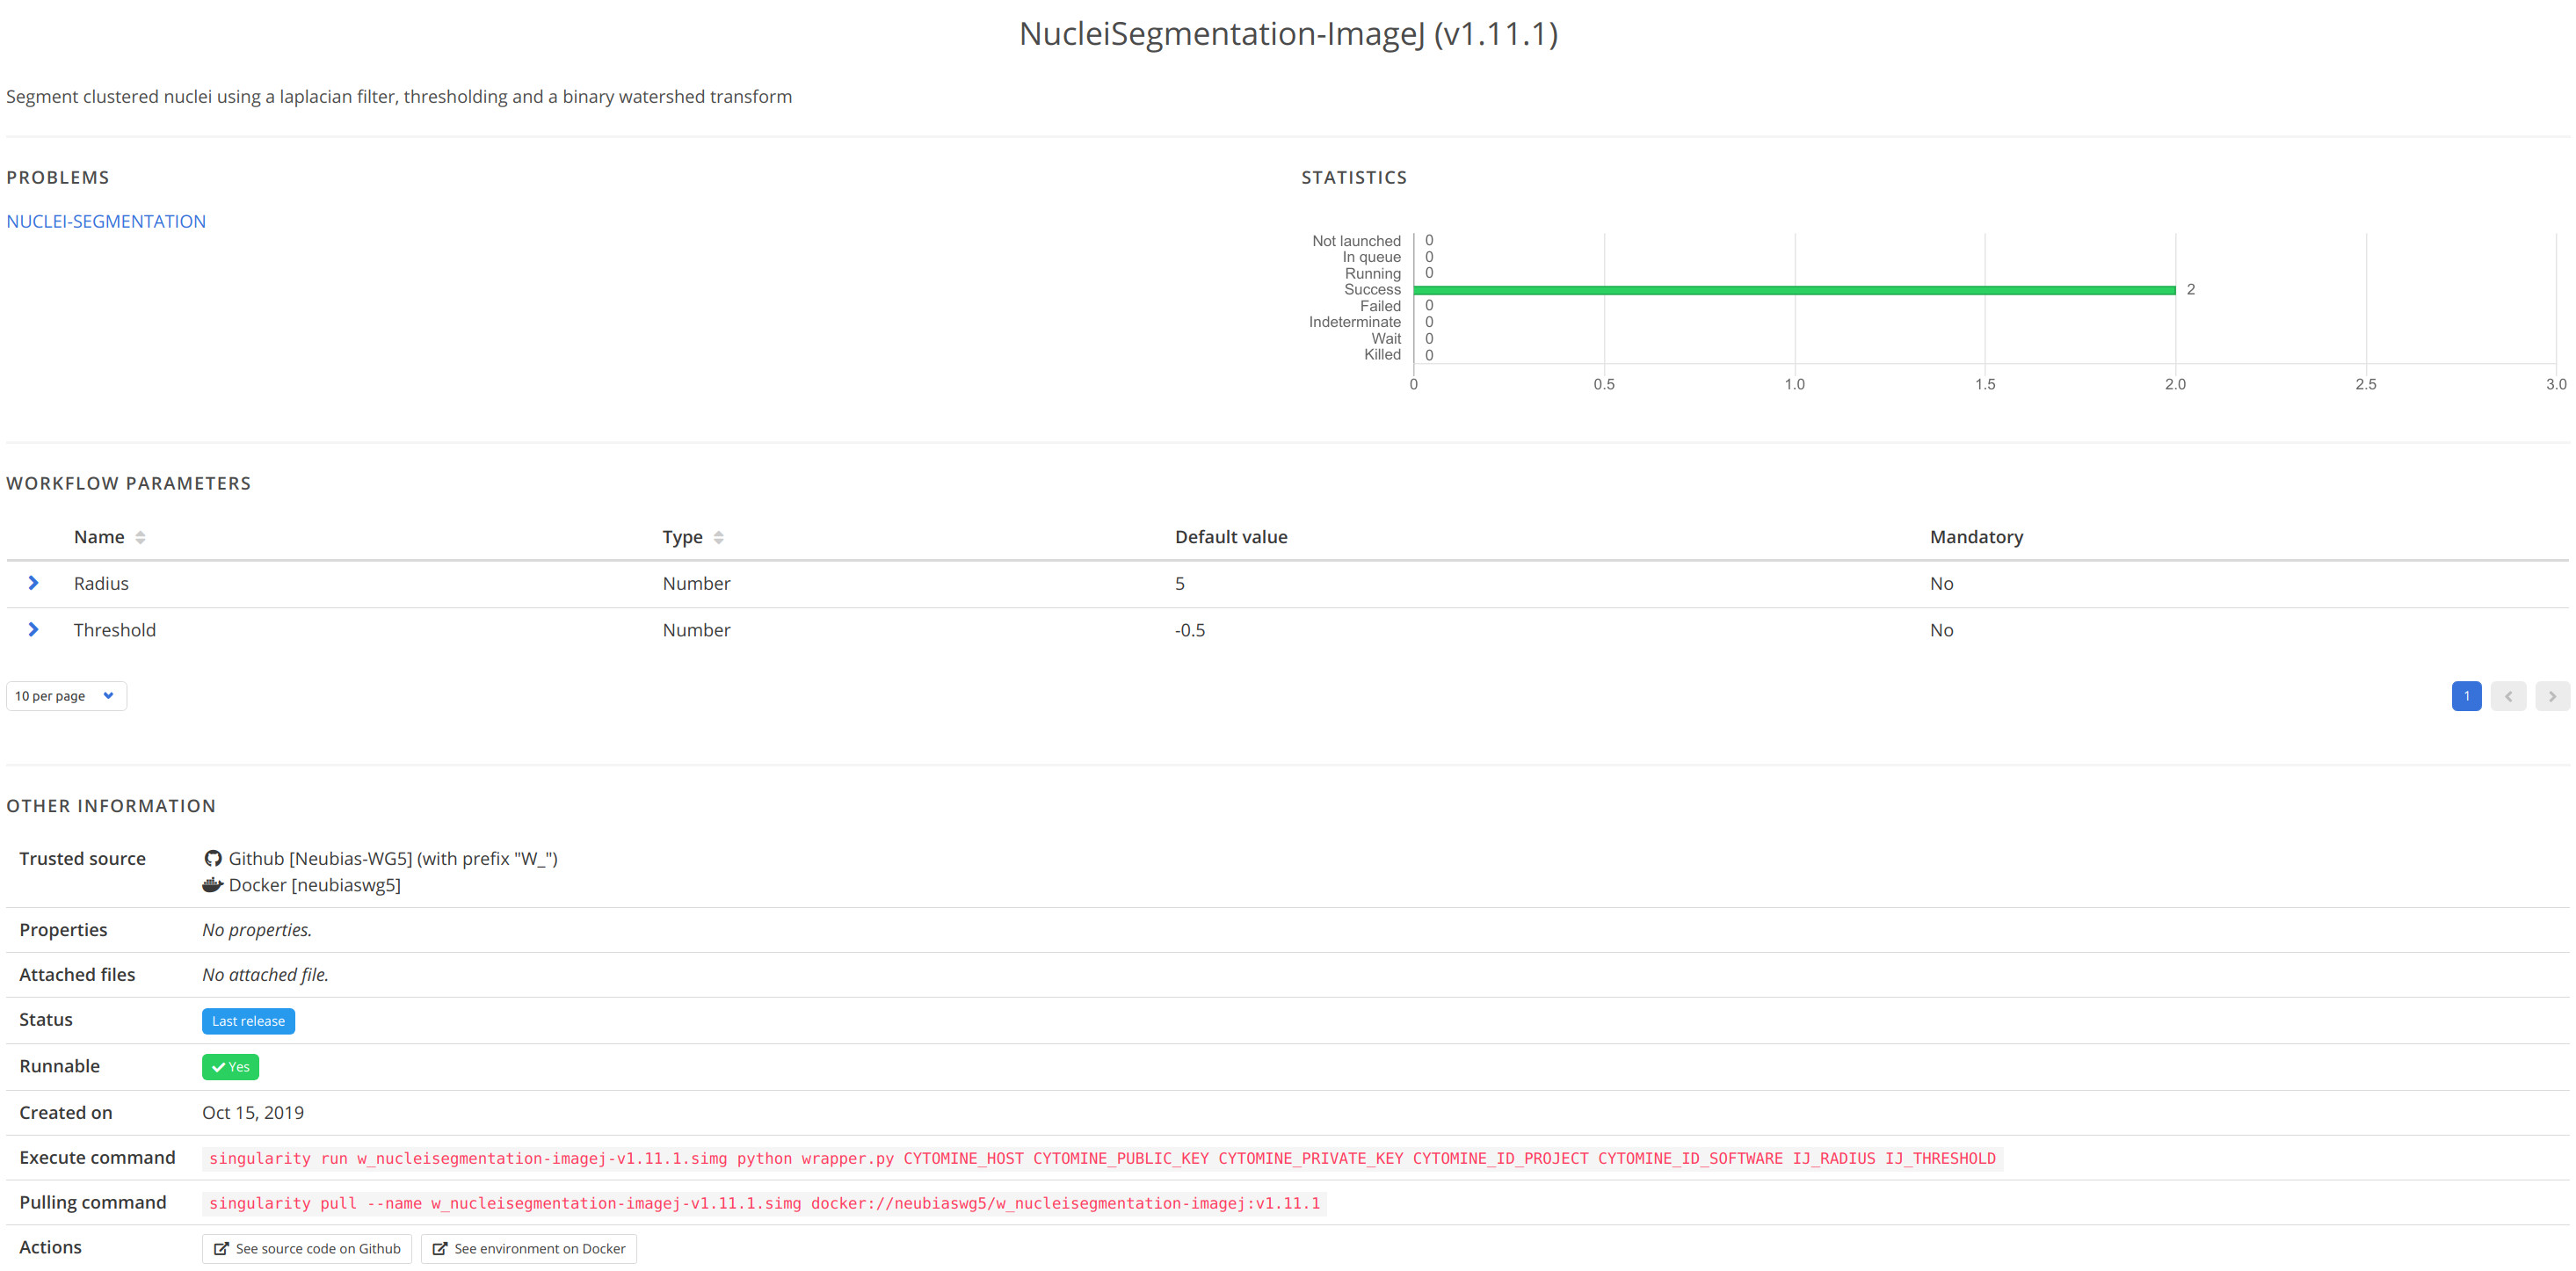
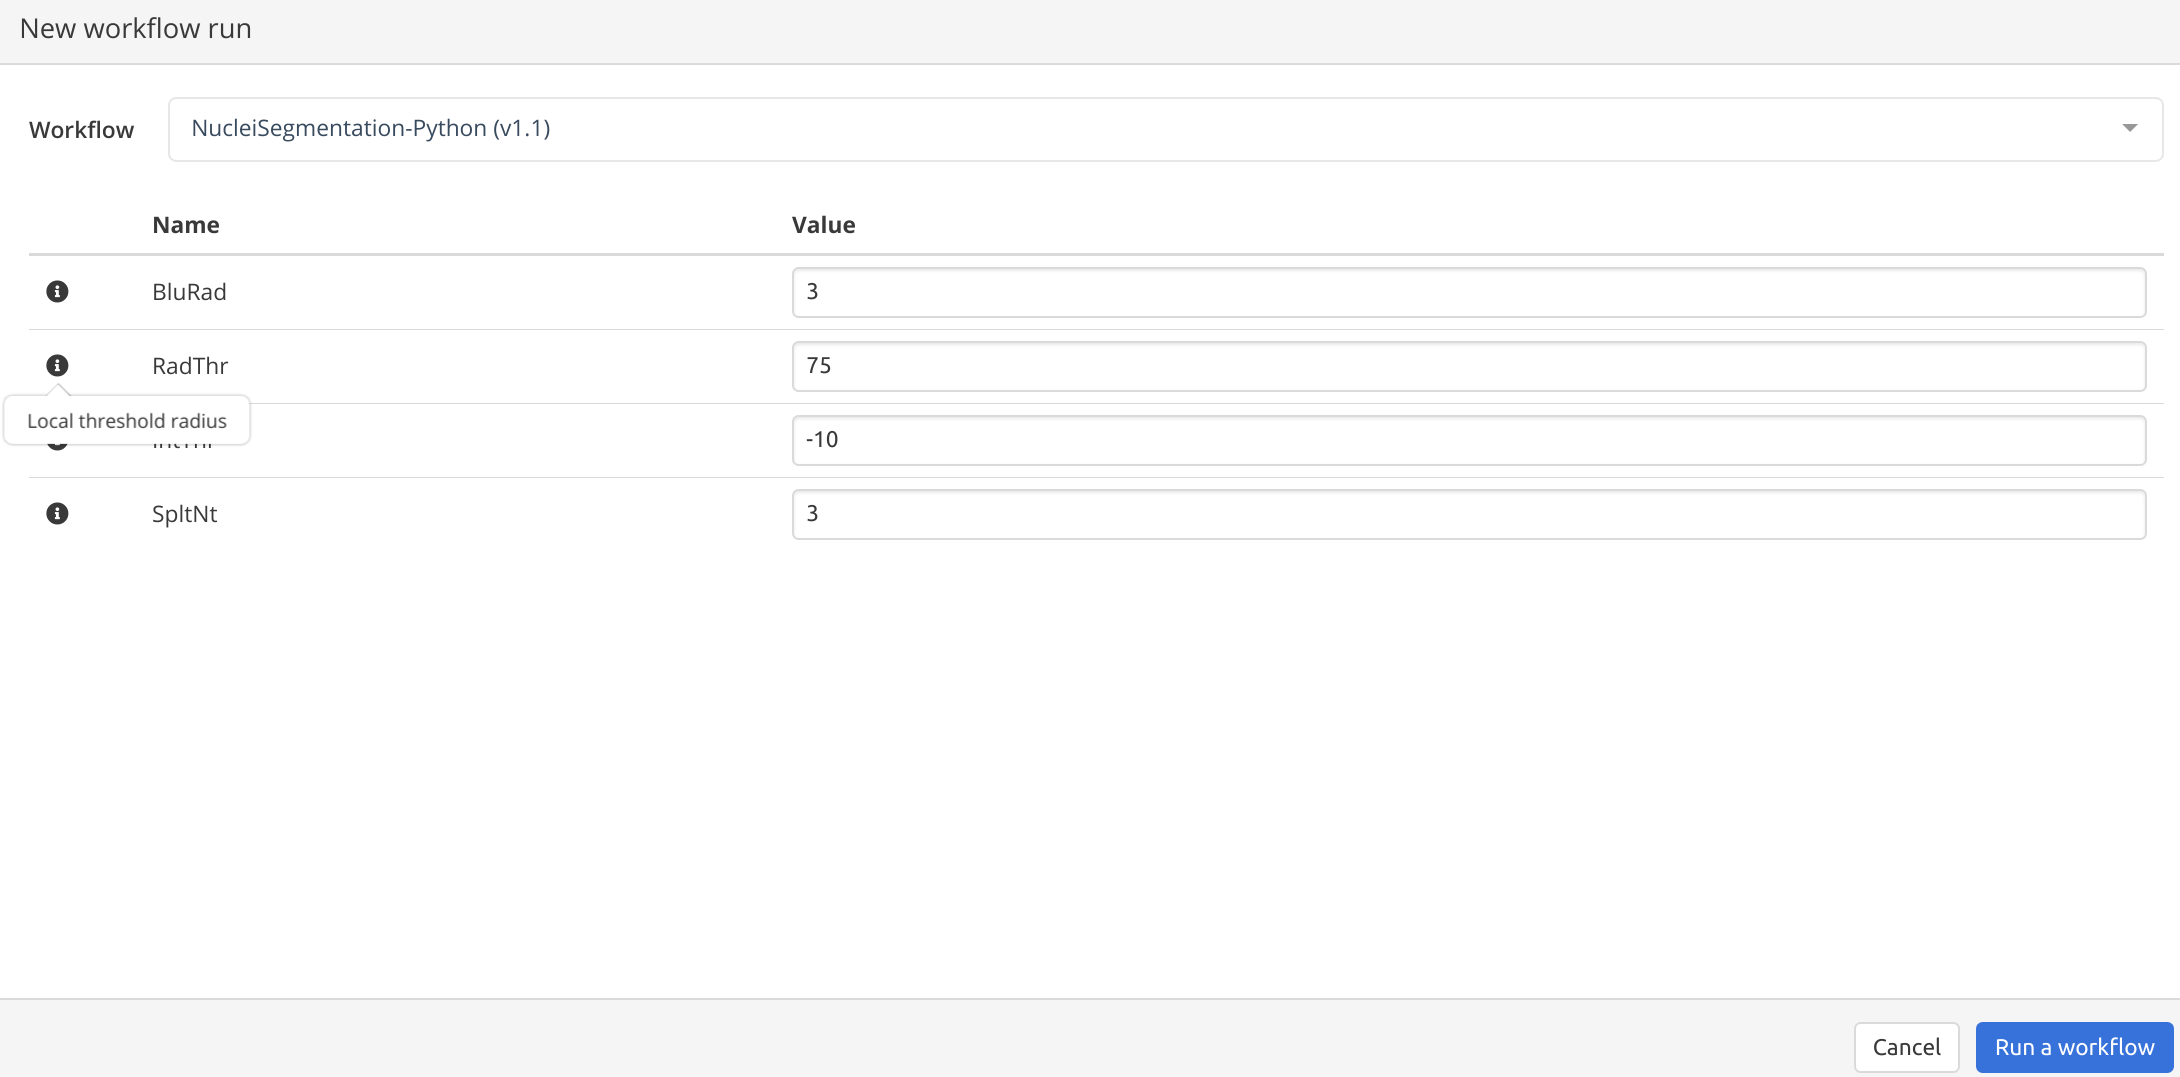
In user mode (the user account requires execution rights that are not provided by the guest account), a workflow can be launched by clicking on its name. This opens a workflow parameter dialog box where default parameters are set so as to bring meaningful results for the images of the project. Some parameter description can be obtained while moving the mouse cursor over its name. Click on the blue button:


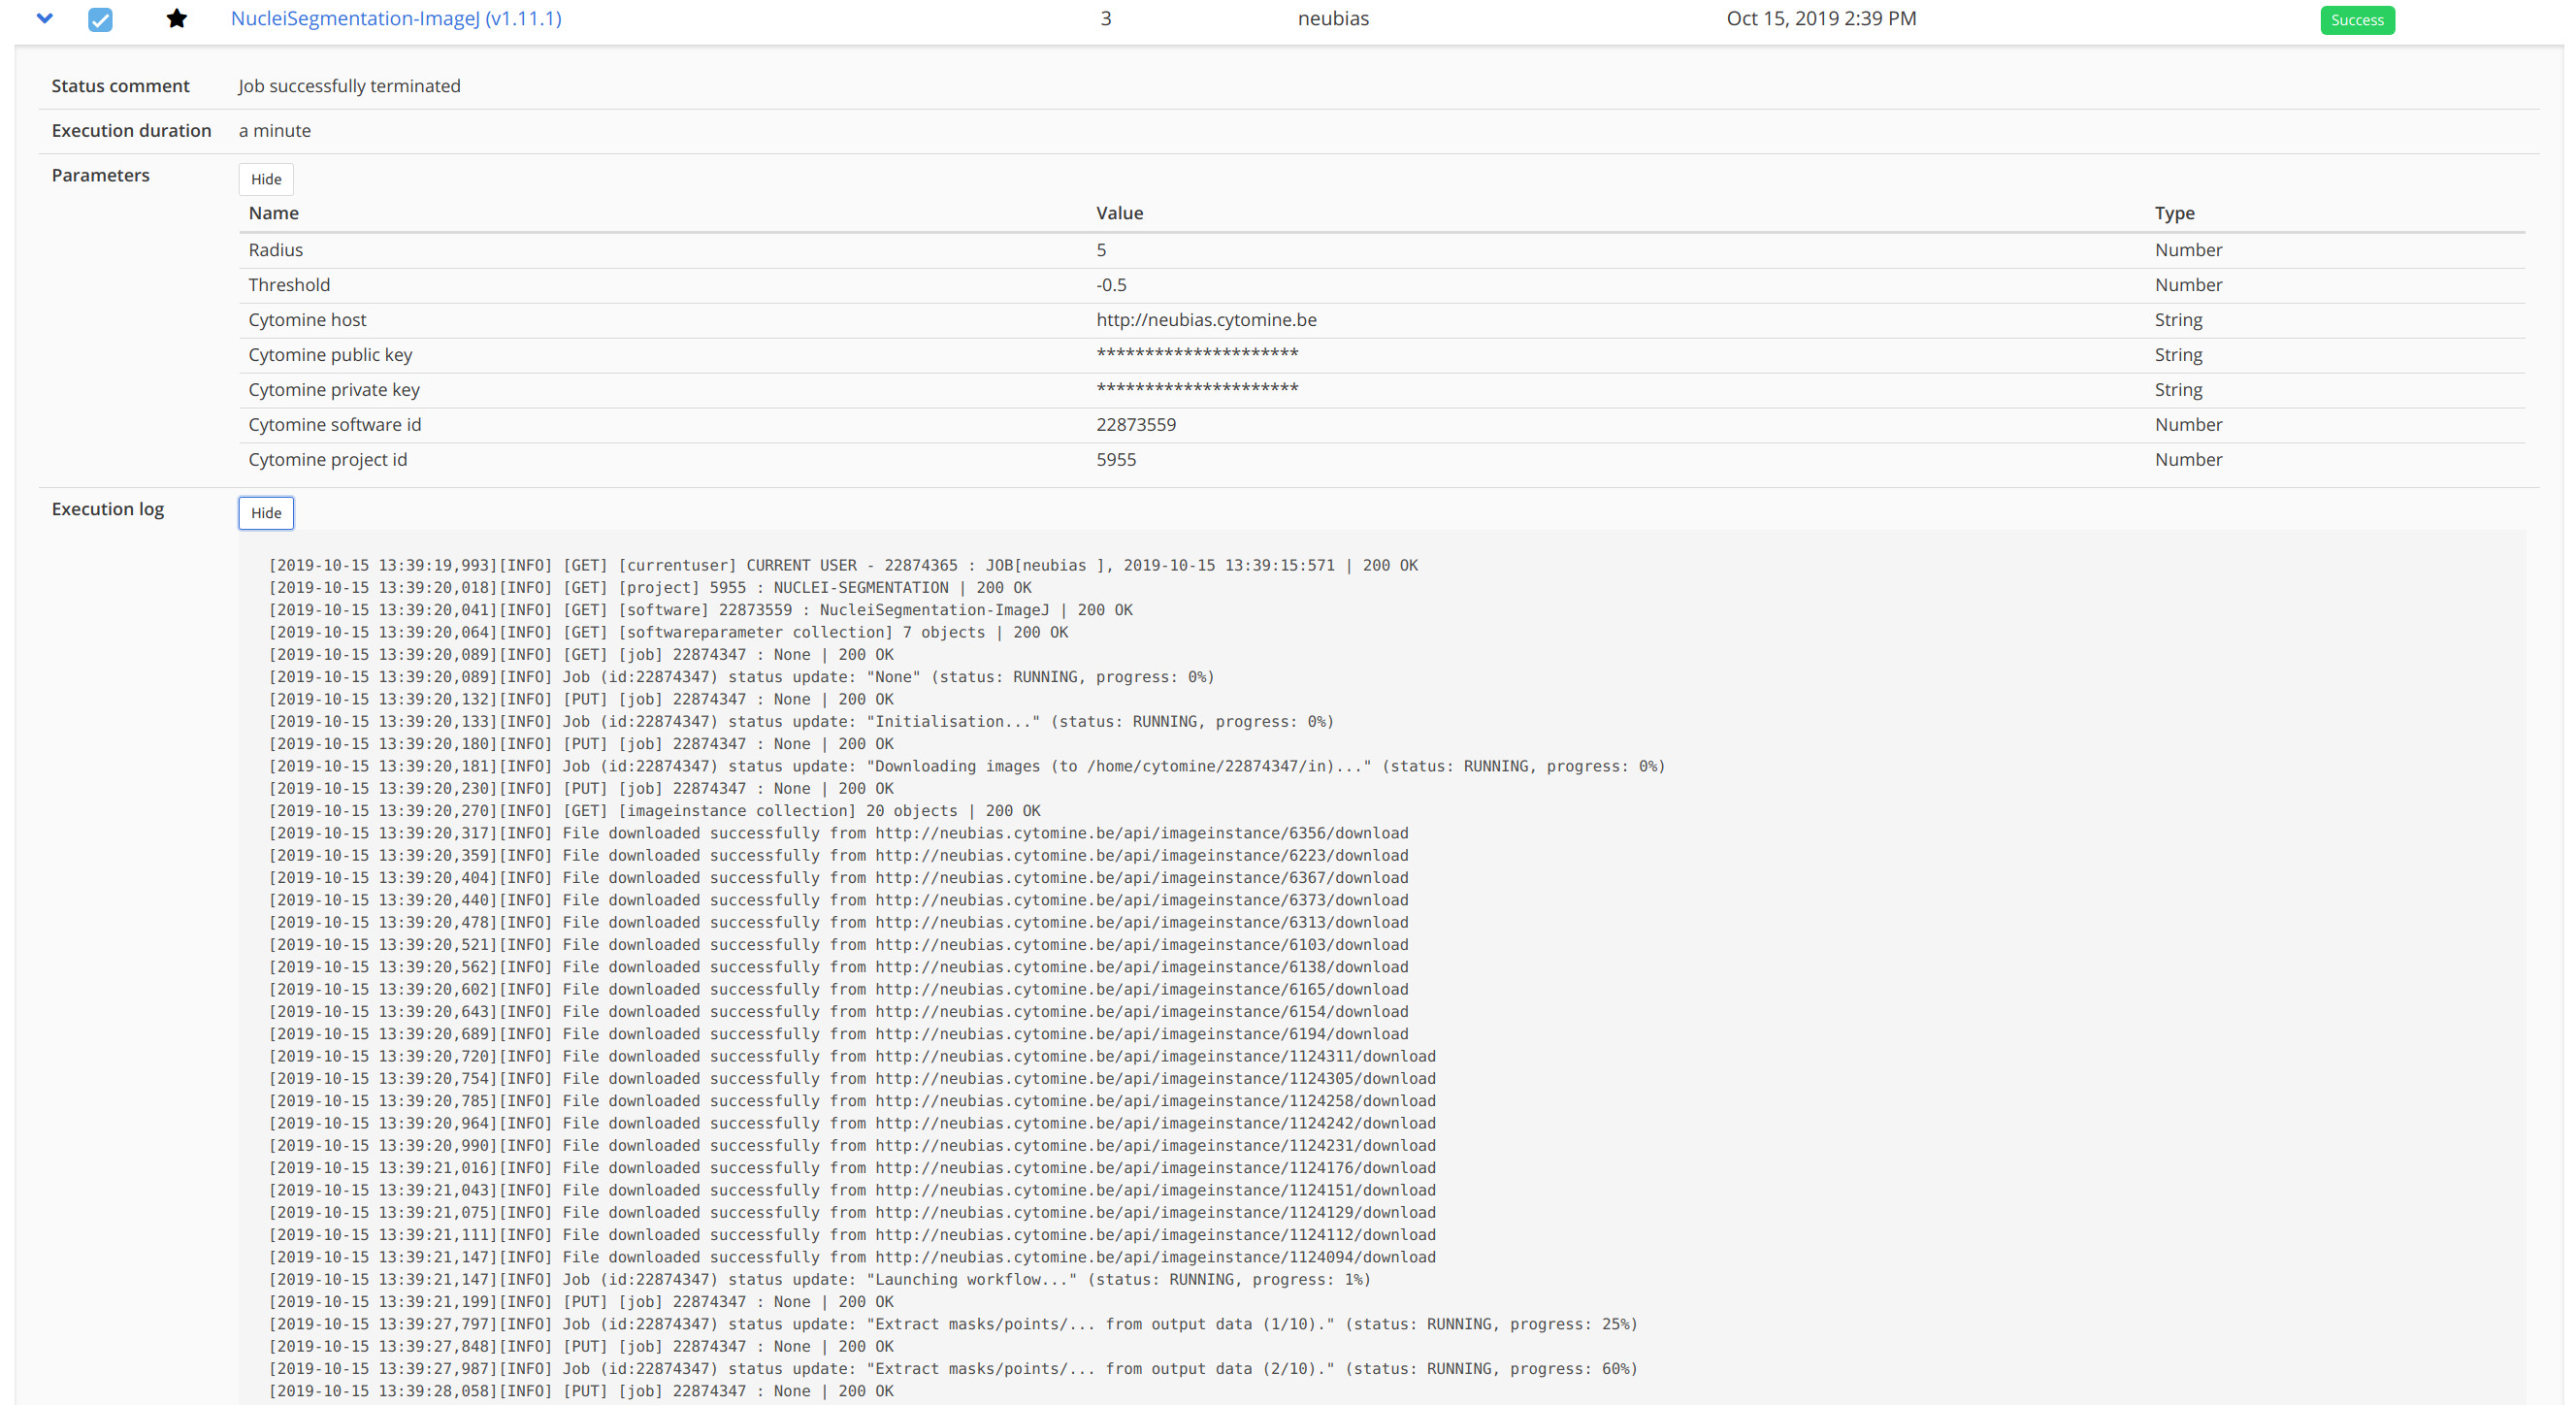
If a job is successful, workflow log, results (annotations), and benchmark metrics are available for this run.
The complete report (log file) of the job is can be shown (Execution log ):
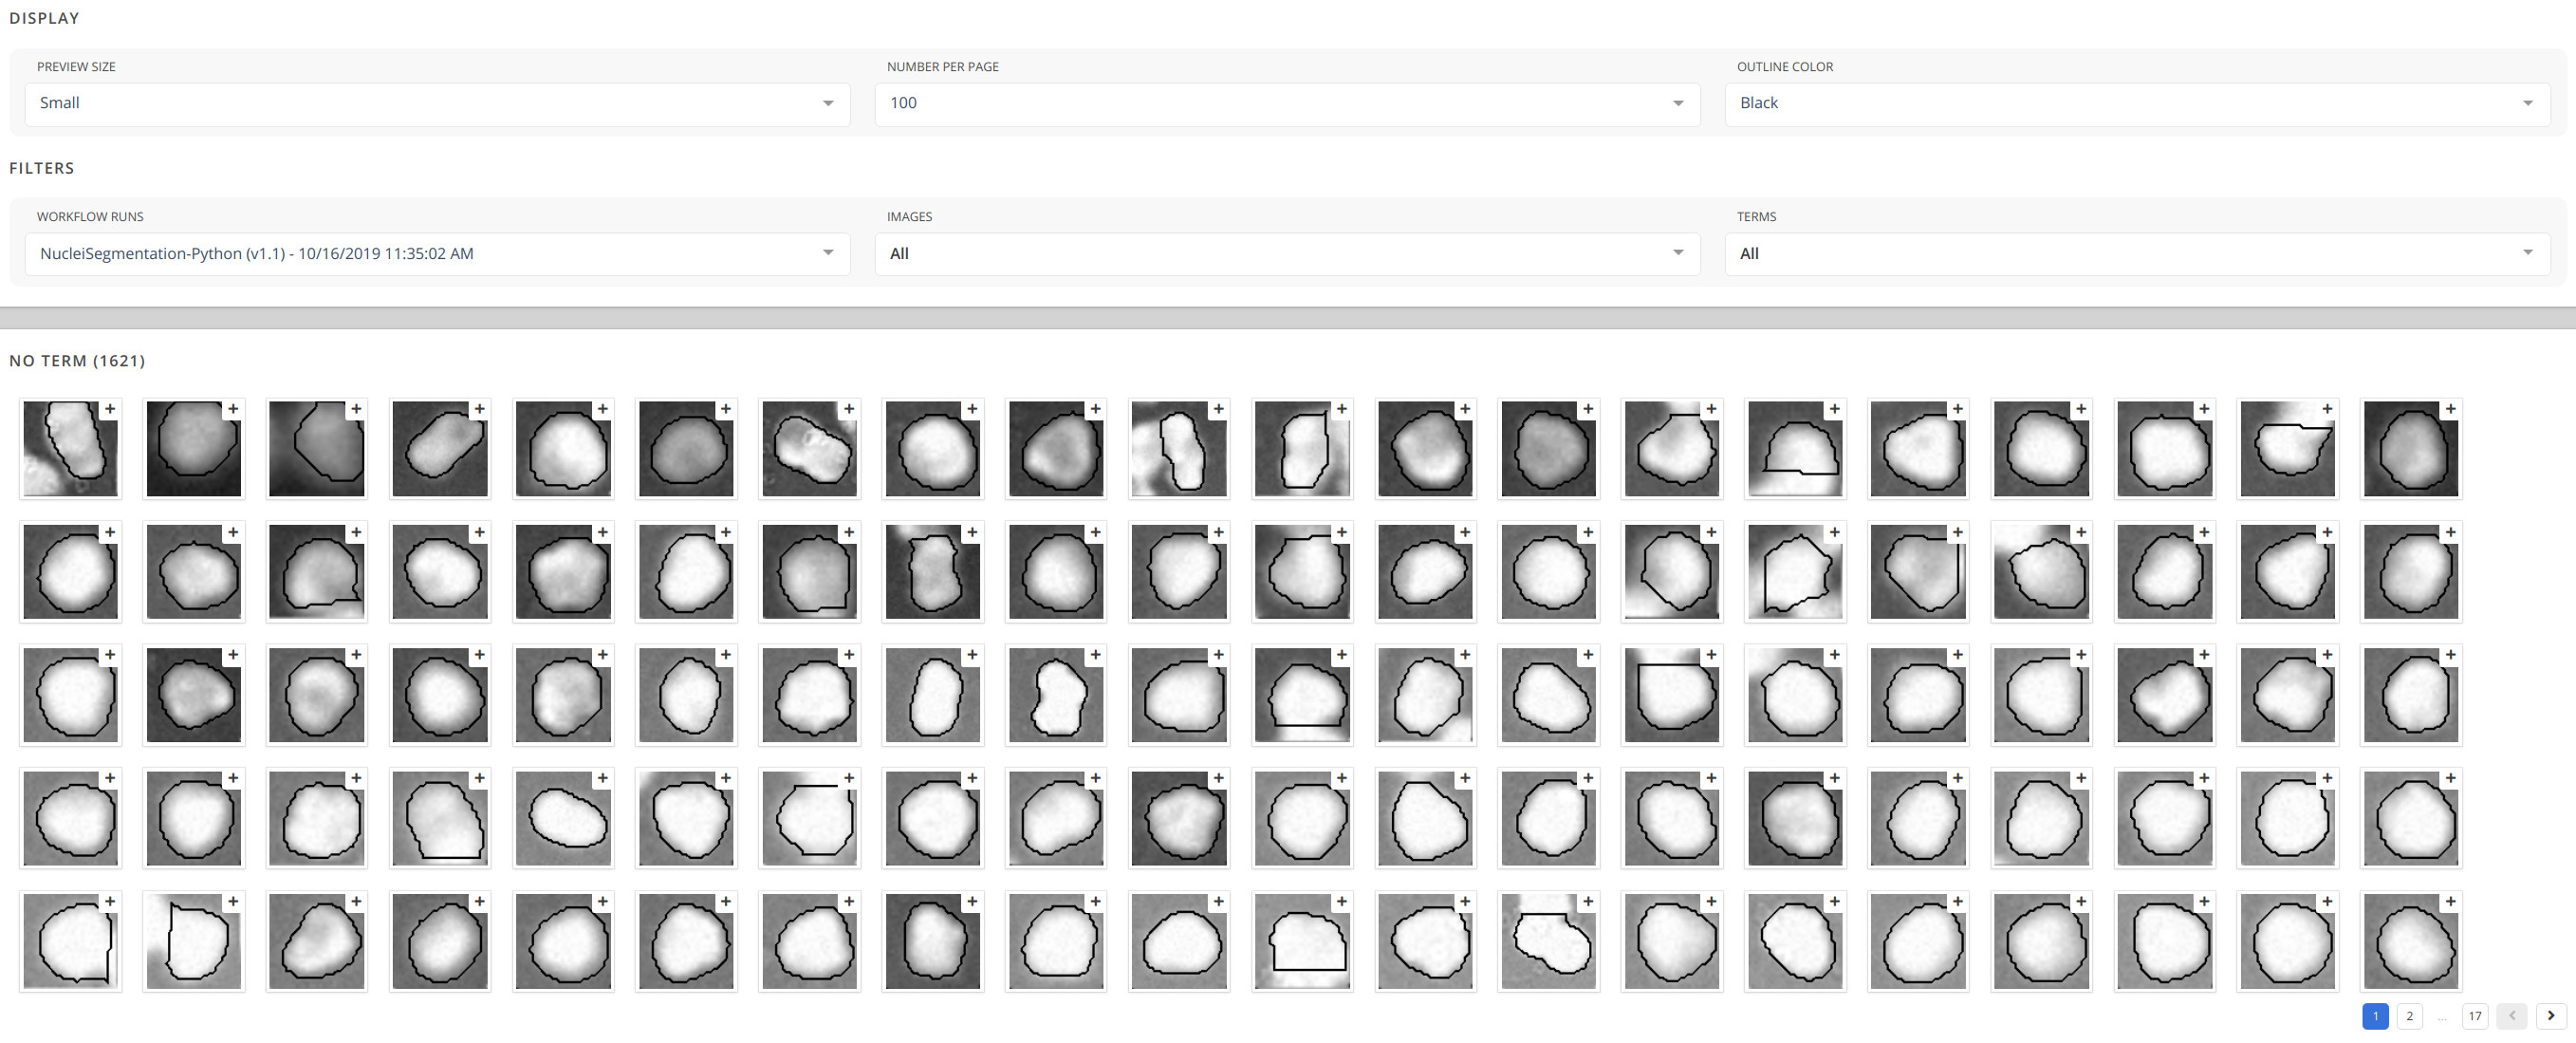
Annotations created by this workflow run can be shown by clicking on Data -> XXX Annotations, opening the Annotations tab where one can filter annotations for all images or individual images:
One can then click on any annotation and further inspect it in the Image viewer where the Workflow layer is overlaid:
Workflow metrics can be displayed as explained in the next Section.
Benchmarking
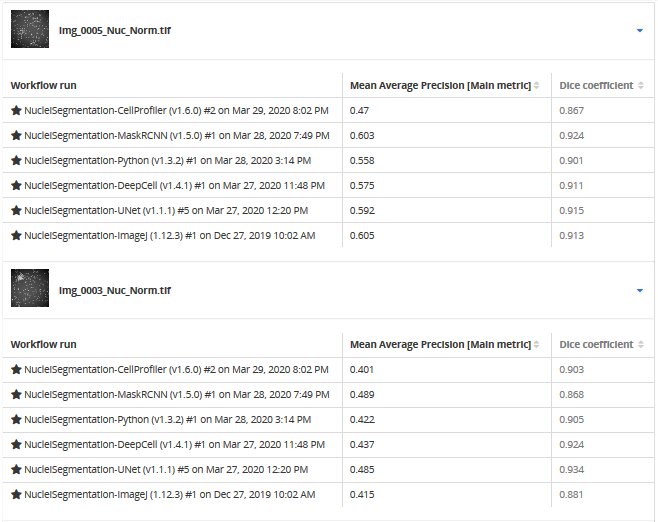
The Benchmarking Section is located at the bottom of the Workflow runs page and it is where benchmark results (metrics) from past workflow runs can be inspected.
A report is generated for all workflow runs selected in the top table ( tick boxes).
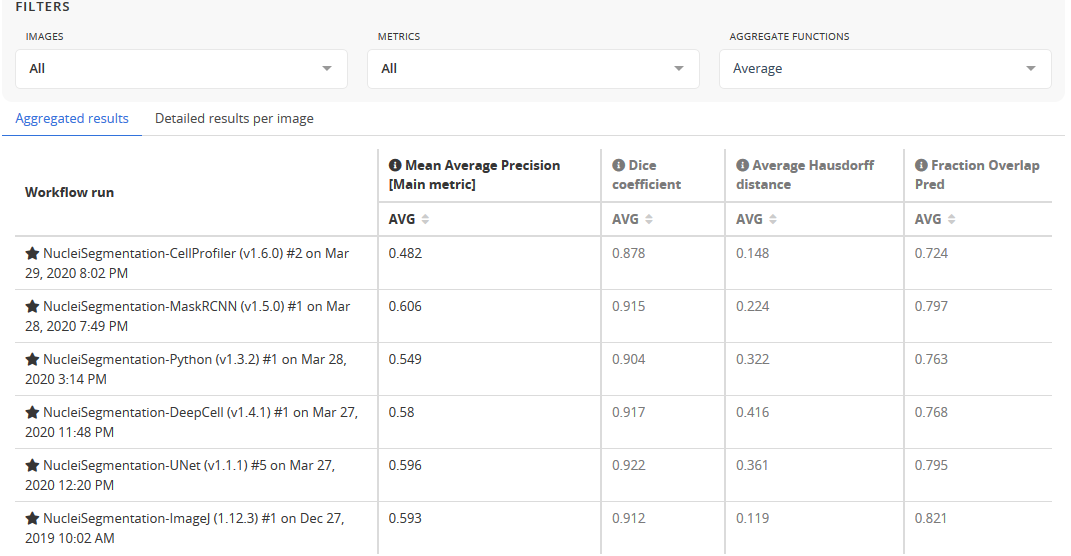
The metrics are computed for all the images from the Problem for these workflow runs. The main metric, displayed in black , is the most representative to rank the performance of the workflows, the other metrics are displayed in gray .
Both selections can be refined using Filters (by Images, by Metrics) and metrics can be explored as aggregated for all images or selected for individual images:
The detailed results by image view is useful to, e.g., find jobs with poor metrics and inspect the associated annotation layer to understand where the workflow has failed. To quickly access an image, its thumbnail can be clicked from the list.
A textual description of a metric is available by clicking on next to the metric name:

Architecture
This section describes BIAFLOWS architecture to deploy reproducible BIA workflows.
BIAFLOWS enables developers to reproducibly package and distribute their workflows by seamlessly configuring their execution environment and specifying standard image and results formats adapted to the BIA problems at hand. Additionally, the functional parameters of the workflows can be documented and default values specified so that users quickly grasp what results should be expected (for the sample images stored in the system) and how they compare to other workflows (both visually and from relevant, documented benchmark metrics).
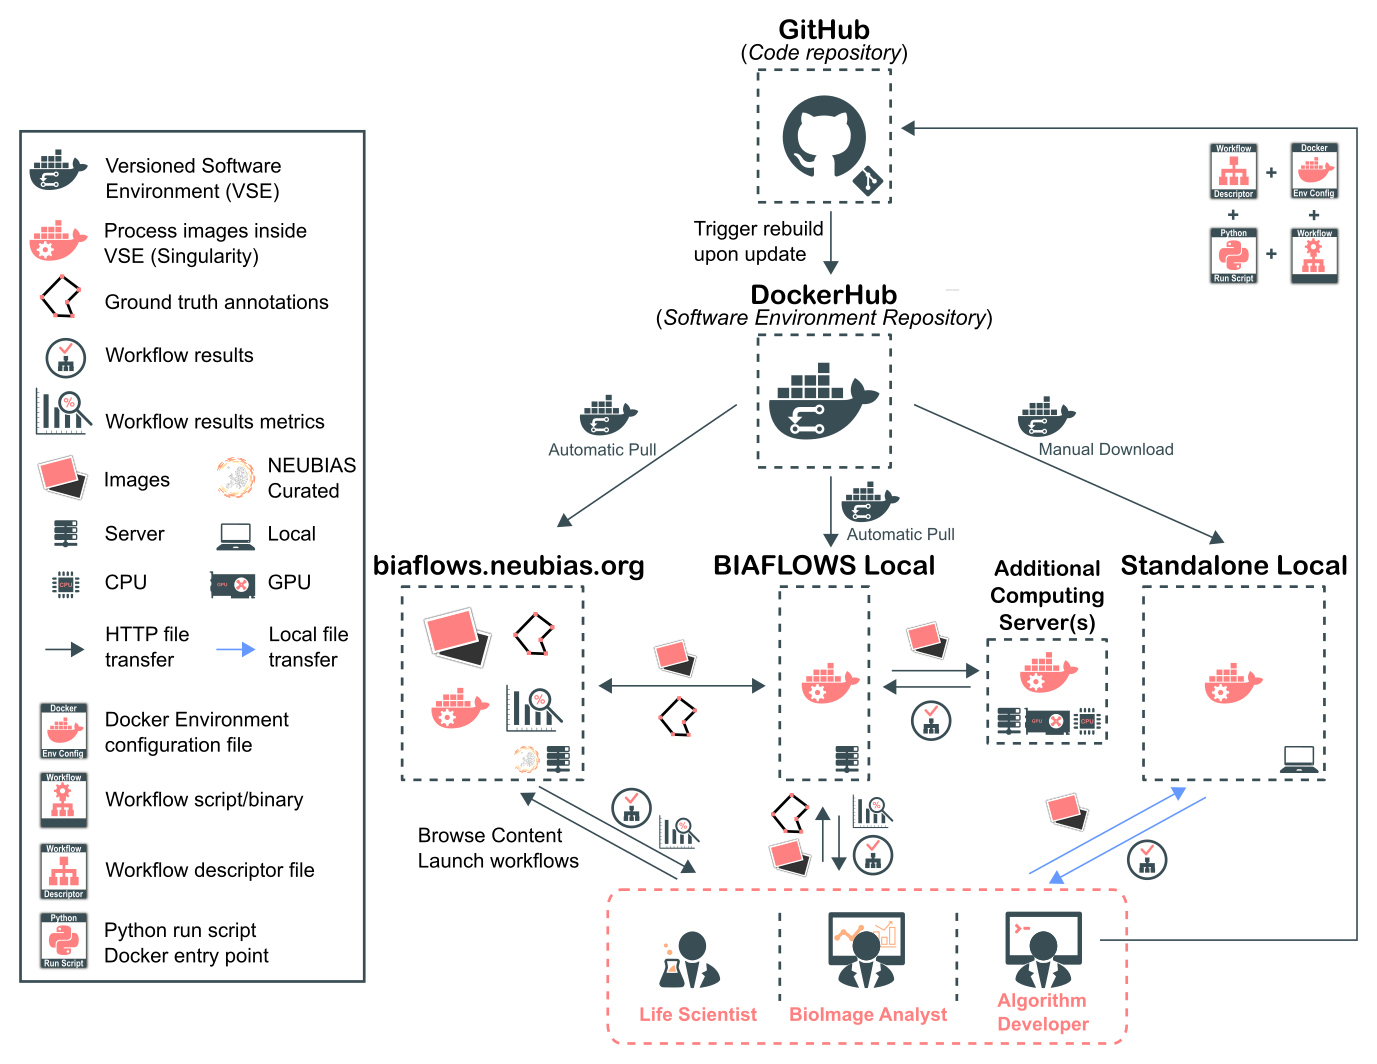
Workflows are hosted in a trusted code repository (GitHub) as a set of 4 files:
- a Dockerfile configuring execution environment (OS, installed software)
- a JSON descriptor configuring problem class (e.g. object segmentation) and workflow parameters
- the workflow source code
- a common wrapper script sequencing all operations
Workflow images (Docker images) are automatically built by DockerHub (cloud service) whenever a new workflow version is released from its code repository.
BIAFLOWS instances monitor DockerHub and pull new or updated workflow images to make them available from the web interface.
Workflow images can alternatively be downloaded manually to process local image folders in a (Standalone Local).
Adding content
If you want to package your workflows as BIAFLOWS workflows, or populate a local instance of BIAFLOWS, please read "Installing and populating BIAFLOWS locally" and "Creating a BIA workflow...".
If you want to submit new content (image datasets, ground-truth annotations, workflows, ...) to BIAFLOWS online instance, please write to BIAFLOWS forum or contact us.